Monday, 29 October 2012

Red velvet birthday cake

It was my brother's girlfriends birthday this weekend so, as I use any excuse to bake, I volunteered to make her a cake. As we're Chinese I thought a red cake would be a great idea as the colour red is a lucky colour to us! Happy Birthday Christine!

I decided to make the red velvet cake from the hummingbird bakery cook book, which is a recipe for cupcakes that you double for a three tier cake.

It's reasonably simple as a recipe to follow although I couldn't buy any buttermilk so I just googled for a buttermilk substitute, and mixed some plain yoghurt with milk in a ratio of 3:1. I also didn't have the liquid food colouring the recipe requests, so I used some red food paste instead, this was a different consistency so this was a bit of a test!

First job was to cream the butter and sugar, then add in the eggs. Then in a separate bowl I was supposed to mix the food colouring, cocoa and vanilla extract into a smooth paste. There wasn't really enough liquid to do this as I used paste not liquid colouring so I just made do, in hindsight I think I should have added a touch of the buttermilk to this just so I could have added in a smoother paste as the cocoa went in a bit lumpy and could have been smoother. Anyway, I then added in my 'paste' followed by half the buttermilk, then half the flour, then the rest of the buttermilk and the rest of the flour. Finally I added in the salt, bicarbonate of soda and white wine vinegar. Mixed it until it was smooth, I then divided this between my three tins and put them in the oven for 25 mins. They had cooked perfectly at this point so I took them out and let them cool before icing.

This was quite tricky and I have made this cream cheese frosting before for the carrot cake and it was far too runny. Looked like a cat had thrown up on my cake... Anyway I was a bit nervous, but decided to stick faithfully to the recipe. The recipe does say to mix it, in the icing sugar and butter, then put all of the cream cheese in in one go. Then you put it on high in the mixer for 5 mins but not too long as it can go runny. So this time as soon as the frosting mixture was smooth, I stopped mixing. This worked loads better, the cream cheese frosting was still thick and would not run down the cake at all.

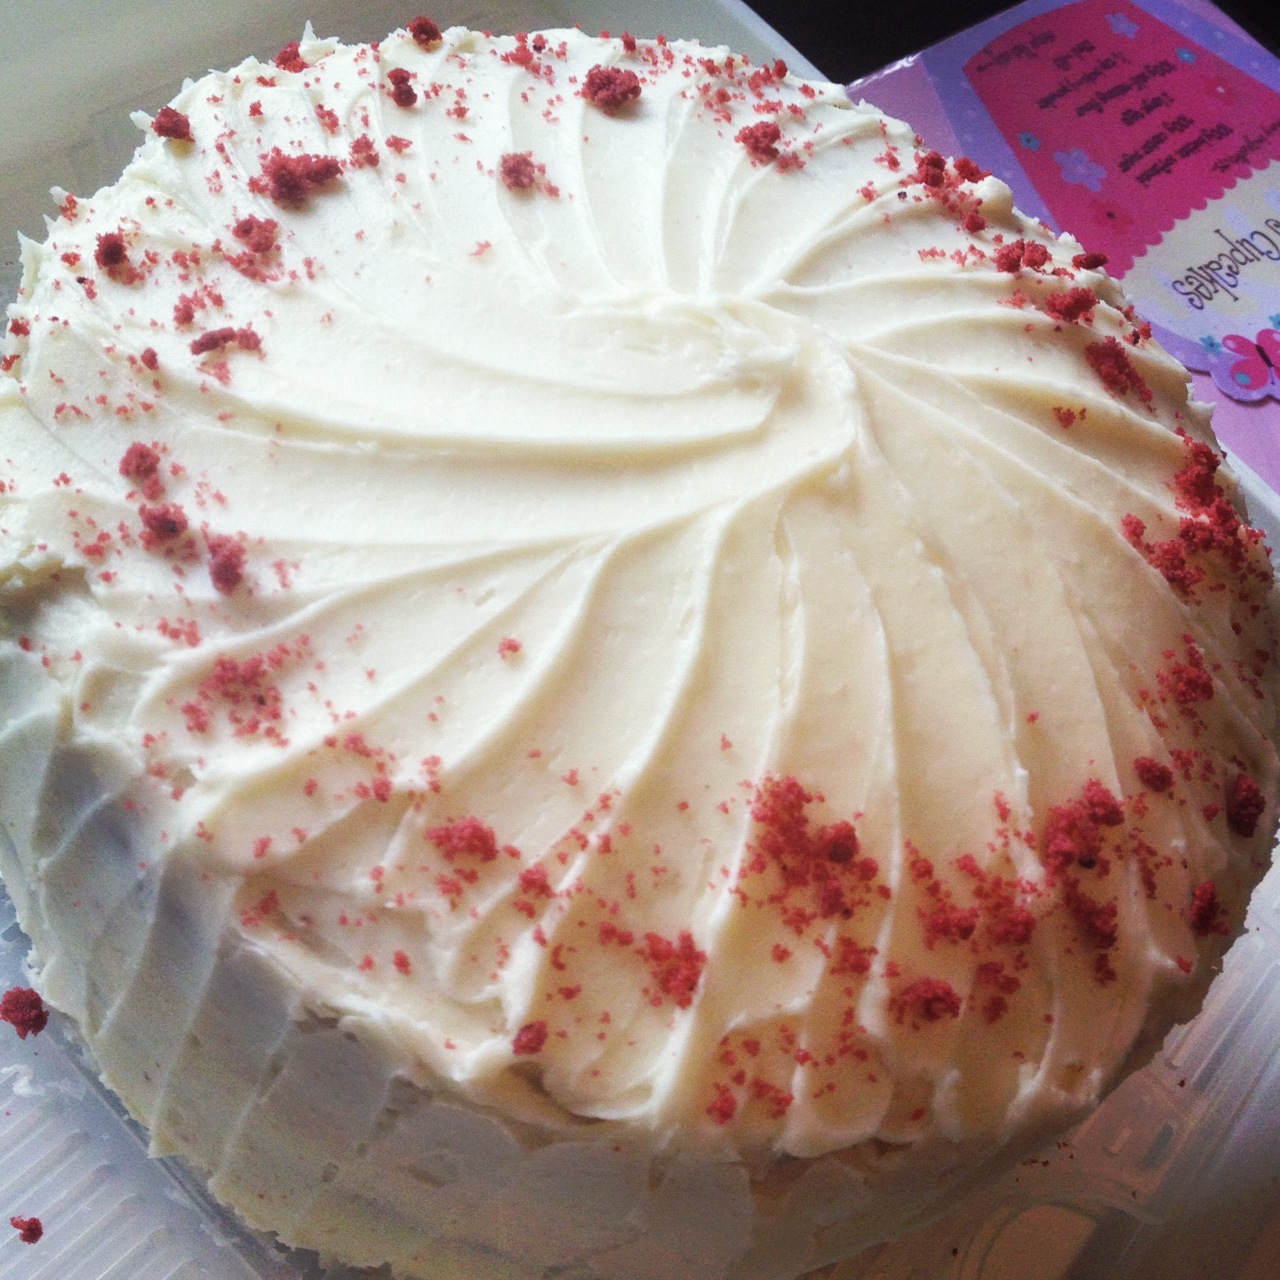
First I leveled the cakes, the bottom and middle layer I had to slice the top off in order to get quite a level surface to balance the next layer on. Then I sandwiched the cakes with the icing and them had to ice the outside. I tried to do a thin layer of icing first to get rid of the all the small crumbs of cake then a thicker layer of icing on the top to cover this as the final finish. This did work a bit better but not as well as I hoped, there were still a few crumbs that I could see in the icing. To try and get a bit of a finish to the iciny I used a palette knife around the sides from bottom to top, and swirled it across the top as well. I also used some of the scraps of cake to get some crumbs to decorate across the top and here it is!

Its a very sweet cake as both the cake and the icing are super sweet, but its very moist and a nice celebration cake. Here you can see the three layers and the frosting*:


And here is a picture of the whole cake with the crumbled red velvet on the top and my attempt at icing!


* Unfortunately I keep forgetting to take pictures during the earlier stages to post, must try harder next time!

Sunday, 21 October 2012

Danish Pastry

Haven't posted in a while as I've been away on holiday so this is my first weekend back in my normal routine....So I decided to buy the new Paul Hollywood cook book and on the front cover is a picture of a baking tray filled with pain aux raisin, and they looked so delicious I just had to try and make them.

Making danish pastry is a much longer process than most of the other baking I've done, but the instructions in the book are fairly self explanatory. The pastry requires a WHOLE pack of butter and quite a lot of folding and chilling in the fridge. It also requires you to be quite good at rolling pastry into a nice standard even shape. I found it quite hard to keep the butter from melting in my kitchen as it is quite a warm room.. First of all you mix the basic pastry mix in the food mixer. Then you roll out the pastry and add in the butter. You then need to fold it up so you get layers of butter and pastry. The instructions in the cook book are great for this and there are plenty of illustrations so you can work out how to do it. But basically you should have a layer of pastry then butter, then pastry, then butter, and a final layer of pastry. You then chill this for an hour, then roll it out to the original size and re-fold the pastry as above creating the layers you want for Danish pastry. You have to keep doing this for 3 hours, then finally you leave the pastry in the fridge overnight.

I took out this huge piece of pastry out the next morning!


Then back to my cook book and I discovered that the same pastry can be used for more than pain aux raisins so I decided to divide this in half and use half for raspberry danish as well!

On to the creme patissiere.. this requires 4 egg yolks, sugar and milk and a lot of stirring on the heat preventing the mixture from catching. I was very nervous about burning the milk as this is soo easy to do and I think I took it off the heat a touch too early so my creme pat ended up being a touch to runny. I think its supposed to be quite solid but mine was touch too liquid, but rather than risk burning it as I didn't have any spare milk I decided to use it anyway! The recipe says it takes 20 minutes to make this creme patisserie, and it took me nearly an hour and a half!!

I then got on with the pastry. I divided my massive pack in half and decided to go for the raspberry stars first. This was a bit fiddly and I ended up with quite a range of sizes of stars trying to maximise my pastry usage. You make the stars first then leave them to rise, before adding a tablespoon of creme pat and a few raspberries to the middle.

On to the pain aux raisins, this was much simpler, roll out the pastry spread over the creme pat leaving a gap on one length then sprinkle with the raisins. I did made the mistake of not double checking the recipe and rolled the pastry in the wrong direction and instead of the empty end being on the outside of the roll it was in the middle and I effectively ended up squashing a load of the creme pat and raisins out of the end. I tried to poke as much of this back in to the middle as I could!

You then need to rest everything again for 2 hours and I realised that my slowness on the creme pat had meant I had run out of time. I needed to go out before my two hours was up! DIS-AAASTER!

Ok, not really, however, my only choice was to totally over-prove my pastries. When I returned six hours later, they had definitely risen!! But they still turned out pretty well. 20 minutes in the oven and this is what I ended up with!

A raspberry danish:


A pain aux raisins:


And one cut in half so you can see the structure of the cooked dough!

They weren't perfect. It doesn't quite have the defined layers to the dough that I am hoping is due to the over proving. So next time I will allow myself plenty more time to make the creme pat and prove the dough and see what it looks like.

Saturday, 1 September 2012

Great British Bake Off - Treacle Tart

The Great British Bake Off is a real fave tv show of mine, and this year someone I know is on it (well, a friend of a friend anyway)!! Ryan is doing amazingly well and this week after watching the show I was inspired to make Treacle Tart and luckily on the BBC website they have the recipe for Mary Berry's Treacle Tart.

I have a nice new fluted loose bottomed tin to use as well. I started by making the pastry, super easy measuring out the flour and butter and then whacking it straight in the food processor pulsed til it looked like breadcrumbs. Then added three tablespoons of water, and turned it on until the pastry came together. Then I wrapped the pastry in clingfilm and popped it straight into the fridge.

When I was watching the show this week, I learnt that Treacle Tart is actually made with breadcrumbs and zero treacle, who knew?!!? And I know breadcrumbs is best made with slightly stale bread, unfortunately the only bread I had was frozen, but I just defrosted it then, when it was dry it seemed a bit stale so I decided this would do! 150g of breadcrumbs was about 5 slices of white bread, crusts cut off! I then had to get everything else ready whilst I waited for my pastry to cool in the fridge. I greased my tin (my cheats method is just spraying it liberally with my sunflower oil spray), zested and juiced 2 lemons, and weighed out 400g of golden syrup. My teeth hurt just thinking about it!

I then decided about 20 mins had passed and I could get rolling, you have to reserve about a third of the pastry for the lattice top, so I popped some of straight back in the fridge and got rolling out the main bulk of the pastry to line the tin. Something else I've learned from TGBBO is that pastry should be nice and thin, so I endeavoured to get the pastry as thin as possible, then lined the tin. This wasn't too hard, although the pastry was possibly a touch too thin by the time I was done as I had a bit left over, but I patted it all down nicely into the sides of the tin and pricked the base of the pastry with a fork.

The treacle tart is not blind baked so I'm a little worried about having a soggy bottom but hopefully it should be ok. I then warmed through the golden syrup and stirred in my breadcrumbs, zest and lemon juice until I had a nice mixture. Mary said on the show that you have to mix the breadcrumbs thoroughly otherwise the mixture maybe too cloy. Mix mix mix.. then I poured mine into my pastry case. It looked a bit runnier than what I saw on the tv but I didn't have any more breadcrumbs to mix in and I'd followed the recipe exactly so fingers crossed!

Now onto the hard part.. the lattice top. They didn't get this tip on the show, but Mary Berry advocates rolling out the remaining pastry, egg washing it, then putting it back in the fridge to harden it up a bit. You don't cut the strips until you take it out of the fridge again. So this is what I did... I think my lattice strips were a bit too fat so they didn't look great and I followed the method on the tv of laying it out on greaseproof paper first then transferring it straight onto the tart rather than attempting to create the lattice on top of the tart. I just about managed to transfer it, but my strips were definitely too thick...

Then popped it straight into the oven, 10 minutes at 200 to colour the pastry then turn it down to 180 for another 30mins.


Somewhere in the middle my treacle decided to rise up in the pastry case, I'm not sure if this is because my oven was too hot (its a fan) or because the pastry had risen underneath... but it rose in the middle and broke my lattice... *sigh*.. but here is the finished article!You can kind of see the cracks right in the middle although it sank back down as it cooled so it it was flat.


It was yummy! Much more lemon-y than I expected. But this took away the super sweetness that I was expecting and that I remembered from school dinners! Pastry was nice and short, thin, and not a soggy bottom in sight! Overall - very pleased with todays efforts!


Here it is looking pretty with a scoop of vanilla icecream on top!


Tuesday, 28 August 2012

Sticky gingerbread and orange cake...

My in laws live down near Bristol and every time we visit I bake my father in law a cake. He LOVES it! And this August bank holiday I had the challenge of baking a cake that I could bake on Thursday evening and that wouldn't be eaten til Sunday. I opened up my baking bible, and hey presto, under the headline Sticky Orange and Ginger Cake, the words 'this cake is even better if you wrap it in baking parchment and foil for two days before icing' (and I assume munching!).

So I got my apron on and started weighing out treacle and golden syrup and boiling it up with some water in a pan which felt quite strange. Then I spent some time lining both the sides and bottom of my tin. I followed the recipe to a 't' and it did appear to be quite a runny mix, aha that's why I had to line the sides! However, I persevered and Mary Berry has never let me down. 50 mins in the oven and it definitely looked and smelled like a cake! Although, as you can see it cracked on the top a little.

I left it to cool over night then wrapped it in parchment and tin foil and popped it in old chocolate tin and put it in the boot. 

Sunday arrived and I opened my tin. As I hadn't cut into it earlier I couldn't see if it was stickier or not, as it was promised to be, but it still smelled nice and I got on with making the icing. 150g of icing sugar and the juice of an orange. But only enough juice to make the icing, liquid but thick. I was a bit impatient and I think I ended up with about the juice of half the orange which was a touch too much, but it's a fine line, and it wasn't too runny. 

It tasted fine, I like ginger cake and this had a nice orange flavour from the icing. It wasn't particularly sticky as ginger cake goes, not sure if I didn't wrap it tight enough or maybe the car was a little warm for it for two days but it definitely tasted and looked pretty good! 

Saturday, 4 August 2012

Pulled pork

Haven't posted for a couple of weeks, but I made this last weekend! 

As a food lover, I love TV cooking/eating programmes, Diners, Drive Ins and Dives is popular as is Man Vs Food. I was watching a bit of a marathon of both these shows and had a really craving for some pulled pork so thought I'd give it a try myself. 

So on to google, and the always safe option of Jamie Oliver. This is the recipe I went for: http://www.jamieoliver.com/recipes/pork-recipes/southern-style-pork-slaw_1

However, as this is a recipe for 10-12 people, I had to scale it down a bit so I bought a MUCH smaller piece of pork ie. enough for two people and not bone in, I think it weighed less than a kg, so used a bit less of all of the spices but pretty much did it exactly as it stated in the recipe! I also made the home made coleslaw to go with it. 

After about four hours in the oven at about 150 degrees, my much smaller piece of pork looked like this: 


Really nice crackling, and luckily it was already scored when I bought it so I didn't have to get out a stanley knife. The meat was cooked all the way through, still juicy and very tender. I let it rest for about 15 minutes whilst I whizzed up the coleslaw in my food processor. The coleslaw is a breeze, a bit on the onion-y side but the apples add a nice fresh bite and sweetness that works well. I also prefer my coleslaw quite dry and without loads of mayonnaise so I only put in about 1 tablespoon that just bound it all together. 

I carved up the pork and ended up with this! Which we had with the coleslaw, (the coleslaw isn't particularly photogenic so I didn't upload the photo!) Then nice bread rolls and all this lovely pork with a scattering of fresh mint over the top! YUMMY!

Sunday, 8 July 2012

Vanilla Macarons

So with my leftover egg whites I decided to have another shot at macarons... I've tried two different recipes before, but whilst they have always tasted great they have never had the distinctive 'feet' and have always cracked!

This weekend I tried another recipe, from one of my newer cook books, Tea with Bea (thanks to Phil and Mel for this book)! The recipe actually called for six egg whites, but as I already had two I just used one extra and halved the recipe.

Macarons appear quite technical to make and call for heating sugar to make the meringues plus a bit of piping, but I don't think its too hard if you follow a good recipe! I decided not to use any food colouring either so they came out quite pale in colour but a miracle, no cracked tops and some 'feet'!!! Compared to the picture in my cook book they are a bit flatter, I think I should have whisked the meringue a bit more as I don't think they quite at the 'stiff' stage before I added in the sugar! Also having tried leaving them to rest for 30mins and whacking them straight into the oven my last two tries, I left them to rest for 40 mins until the skin formed. Also, the full recipe said it would make 30 so I was expecting half to make about 15, but it made at least 20 and I think mine are average sized rather than small, although I guess I would hope to make they a bit taller next time...


Hallelujah! Feet appeared! Here is a pic of some filled just with whipped cream! Another trick I've learned is not to fill them unless I'm eating them this means they stay slightly chewy. You can just whip the cream ready and leave it in the fridge. I think next time, I'll definitely add some food colouring as whilst these are lovely they look better in pretty pastels, also I may start experimenting with flavours.. maybe pistachio or different style fillings. Anyway, these are the best I've ever made and they tasted great too!


Saturday, 7 July 2012

Swedish Summer Cake

At it's strawberry season I decided to make something with strawberries so got out my recipe book and saw an amazing picture in my Nigella's Kitchen cook book for a Swedish Summer Cake. Essentially a layer cake of sponge, strawberries, cream and custard! Yum! You can google the recipe and get it online...

First I made the custard, different from the ice cream from last weekend, it was just two egg yolks, milk, sugar and cornflour. I think I could have heated this a little longer as my cooled custard was still quite runny but I was nervous of burning the milk...then I cooled this down and whacked it in the fridge covered with clingfilm touching the top of the custard to stop a skin forming.

Then onto the sponge cake. The recipe calls for one cake, with no fat so a very light sponge. Just three egss, 150g of flour, sugar and baking powder. Followed the recipe exactly and and it was cooked in just 30 mins. Here it is just cooling:


Then I got on with the strawberries, I macerated 2/3 of them in sugar.


The hardest part of the recipe is assembling the cake. I had to slice it into three layers which wasn't that easy with a bread knife, although none of the fell apart which I think was quite lucky.


As I mentioned earlier my custard was a little runny and I ended up with a few more strawberries in the middle layer than the bottom, as you can probably see, then a nice topping of cream and a few strawberries for the top.

And hey presto! Super easy actually! It tasted great, the sponge was airy and light (if you've ever eaten a Chinese sponge cake it was very similar to this), lots of strawberry flavour and plenty of cream and custard! Overall, a success!! Now I have two egg whites left.. what to do?!